[vc_row][vc_column width=”1/4″][vc_column_text]
[/vc_column_text][/vc_column][vc_column width=”1/2″][vc_row_inner][vc_column_inner css=”.vc_custom_1445268100189{padding-top: 20px !important;padding-bottom: 20px !important;}”][vc_column_text]
12 pro tips to take better pics: Create images that boost your content
[/vc_column_text][/vc_column_inner][/vc_row_inner][vc_row_inner][vc_column_inner][vc_single_image image=”1917″ img_size=”full” onclick=”img_link_large” img_link_target=”_blank” styling=”margin:0 auto; width:452px;” align=”vc_align_center”][/vc_column_inner][/vc_row_inner][/vc_column][vc_column width=”1/4″][vc_column_text]
[/vc_column_text][/vc_column][/vc_row][vc_row][vc_column width=”1/4″][vc_column_text]
[/vc_column_text][/vc_column][vc_column width=”1/2″][vc_row_inner][vc_column_inner css=”.vc_custom_1445268075698{padding-top: 20px !important;padding-bottom: 20px !important;}”][vc_column_text]We’ve long known that images increase user engagement when it comes to content marketing, and in particular, social media posts. According to Hubspot, images and photos are the most important tactic in optimizing social media posts.
Whereas infographics, charts or video content may leave marketing executives scratching their heads because these types of visual content are among the most difficult or expensive to execute, photography wins — for its ease of use and its ability to be shared almost instantaneously, directly from mobile devices.
With these tips from top professional and journalistic photographers around the country, and some practice, you can create beautiful digital images to increase engagement for your brand’s content:
1. Take silhouette photos.
“My biggest tip is to accomplish great sunset silhouettes by using the touchscreen exposure adjustment. You can touch anywhere on the screen to expose for that area of the photo. In this photo of my wife playing on a swing during one of our evening walks, I framed the photo where she was entering and exiting the picture, tapped on the sky to expose for those colors and then snapped the photo when she entered the frame.” — Leslie Westbrook, photojournalist at The Advocate, based in Lafayette, Louisiana
2. Shoot from the level of your subject.
“Are you photographing a child? If so, 99 percent of the time, your photos are going to be better if you crouch down to their level instead of shooting just from where your eyes happen to be based on your height.” — Claudia Laws, managing editor and photojournalist at Rapid City Journal

Image credit: Meghan Lubeck of Meghan Christine Photography
3. Use the “rule of thirds,” but don’t be afraid to use symmetry and repetition.
4. Get up close and personal.
5. Play around with exposure to get more depth, saturation.
“If you have a newer iPhone there is a way to under or over expose your image. While taking the photo, push on the screen and you will see a small sun. Scroll up or down with your finger tips for the exposure you like. I use it a lot for sunsets to get more saturation.” — Andrew West, Senior Photographer, The News-Press, Fort Myers, Florida
6. Be patient. Wait for the interesting moments to happen.
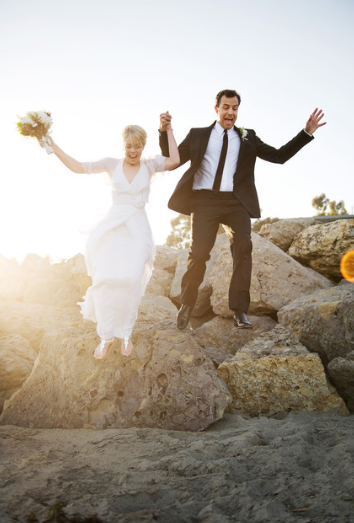
7. Or, when appropriate … Be bold, look for interesting angles, and don’t be afraid of backlighting.
“When looking for places to put your subjects, be it a bride and groom or your own kids, be bold and look for interesting angles. Light is everything. We prefer backlit photos, so shooting on manual and exposing for your subjects’ faces is our go-to. Don’t be afraid to take chances if you don’t know your camera. Put it on M (for Manual) and go for a spin! Then, adjust your exposure until you hit the money shot.” — Cat Benner, Los Angeles-based photographer at nextexitphotography.com, nextexitportraits.com and nextexitstudio.com

Image credit: Adi & Cat Benner of Next Exit Photography
8. Move your feet.
“I live by the Henri Cartier-Bresson quote, ‘If your photos aren’t good enough, you’re not close enough. I’ve changed that a bit to simply, ‘Move your feet.’ By that, I mean think of where you are, not just where your subject is. Is there a tree coming out of your subject’s head? Move your feet to the left or right, or, if you’re feeling particularly lazy, just lean left or right and you’ll change your perspective enough to have that tree no longer growing out of the person’s head. This is one of my favorite photos, showing a tree through a small window. Could I see that tree perfectly framed by the window when I walked into the room? No. Could I see there was a tree out there? Yes! I moved my perspective to frame the tree by the window.” — Claudia Laws, managing editor and photojournalist at Rapid City Journal
9. Make use of “golden hour” or “magic hour” natural lighting — the hour after sunrise and the hour before the sun sets.
“Golden Hour is a photographer’s favorite time of day. It’s when the light is the softest and most beautiful. You can Google what time the sun rises and sets on any given day and go from there.” — Meghan Lubeck, Los Angeles-based photographer, Meghan Christine Photography

Image credit: Meghan Lubeck of Meghan Christine Photography
10. Don’t cut off feet.

Image credit: Nick Amoroso
This (on left). Not this (on right).
Most of the photographers we interviewed try to avoid cropping at the ankles or at any other joints. To salvage a photo, try cropping between the knees and waist, or crop just above the waist and zoom in for a tighter shot.
11. Look for depth and layers.
12. Use laughter to disarm nervousness and capture personality.
“Whether it’s self-deprecating humor or a bad potty joke, put your subjects at ease by using laughter. Work your camera-magic so that your subject’s unique personality shines through each photograph.” — Cat Benner, Los Angeles-based photographer at nextexitphotography.com, nextexitportraits.com and nextexitstudio.com

Image credit: Adi & Cat Benner of Next Exit Photography
[/vc_column_text][vc_separator color=”white”][vc_column_text]
[addtoany]
[/vc_column_text][vc_separator color=”white”][/vc_column_inner][/vc_row_inner][/vc_column][vc_column width=”1/4″][vc_column_text]
[/vc_column_text][/vc_column][/vc_row]


